Sunday, December 27, 2015

Braving THE city

I'm heading off to the Metropolitan Museum of Art this week, braving NYC by myself to see a special exhibit that ends January 10th: Fashion and Virtue Textile Patterns and the Print Revolution, 1520-1620.
 http://www.metmuseum.org/exhibitions/listings/2015/fashion-and-virtue.

The main focus of the exhibit is the Met's collection of pattern books published during this time, supported by clothing, embroidery, paintings and other works of art of the time period.

I'm also going to look for this sculpture:


Master Heinrich of Constance (German, active in Constance, ca. 1300). The Visitation, ca. 1310–20. Walnut, paint, gilding, rock-crystal cabochons inset in gilt-silver mounts. The Metropolitan Museum of Art, New York, Gift of J. Pierpont Morgan, 1917 (17.190.724).

This is about 120 years past my main Period, but totally within the realm of my research.  I'm most curious about the difference in the veils.


Why the difference in headpieces? 
· Mary (on left) seems to have a decorative cord? chain? That is attached to veil, but how does the veil stay on?  Perhaps the chain clips onto both the veil and Mary’s hair? 
· Elizabeth (on right) seems to have a more traditional headband, decorated with embroidery?, and chin strap to which the veil would have been pinned.

Was the difference a part of perceived difference in rank between the two? 
· Religious status: with Mary being more important because she was considered the Mother of God.
· Societal status: With Elizabeth being the higher rank because she was married to a priest, while Mary was pregnant and unwed.

To me the chin strap would make the veil more secure and therefore be used by someone who works.  The lack of a chin strap for Mary indicates that the sculptor believes Mary to be of higher rank, someone who leads a sedentary, non-demanding life, as benefits the mother of our savior. 

This belief of the sculptor, if I am interpreting this correctly, is of course completely contrary to the Bible.  In the Bible, Mary is betrothed to Joseph (Luke 1:27), who was a carpenter, a manual laborer.  Prior to the event portrayed here, Mary had just traveled to visit Elizabeth (Luke 1:39-43).  It’s a good bet she walked there, on foot, without the aid of a donkey.

I'll be lining my cloak so I can display it at the East Kingdom 12th Night  A&S Display/Popular Choice Competition.  That's all that's new in the world of sewing at this time.

~ Marjorie


Wednesday, November 25, 2015

An Independent Scholar

That is what Mistress Ose calls herself when contacting museums for information.  Now that I have finished my first letter to a museum requesting information about one of their items, I suppose I may use the same title.  The letter is now in the hands of someone who will translate it into French for me.

The museum, Musee-Alfred-Bonno is in Chelles, France, what looks like a small town east of Paris.  As such, I'm not going to assume their curator speaks/reads English, hence having my letter translated.  I will mail them both versions just in case I'm mistaken.

A copy of the letter follows:

Dear Sir or Madam,
I am an independent scholar who is interested in one of the items in your collection.  I am hoping you are able to tell me more about it.

I am curious about the embroidered purse pictured below.


My only information about it is what is included with the photo:
Date: 1170-1190
Material: Silk threads on linen
Size: 10 cm x 13 cm


There is much I would like to learn about it as I am interested in trying to recreate it in order to learn more about embroidery techniques of the Middle Ages.  I am hoping you will be able to provide answers to the following questions:

- First and foremost, is it possible that you could email me high-definition photographs of the front, back, and inside of the purse?
- Is the stitching truly worked with silk threads and the base material actually linen?
- Is the purse lined?  With what type of material?
- From the photo I found online, I have been unable to determine what embroidery stitches were used.  Do you have any information about this?
- The buttons on the side and the drawstrings seem to be a type of weaving over a solid disk.  Do you know the material of the disk? The type of thread used for the covering?
- Do you know what type of threads were used for the drawstrings and the carrying strap?


I thank you for your time,

To regular readers of this blog the photo of the bag will look familiar.  This is the next step in being able to reproduce the bag.

Keep your fingers crossed the letter doesn't get lost in the mail when I send it, probably in January (janvier) to avoid the Christmas zaniness in the postal system.

~ Marjorie (said with a French accent this time)

My new mantra

...is "Fraycheck is your friend."*

This became part of my life when I decided to put my device on my cloak.

Vert, in saltire two needles threaded argent, and on a chief invected Or, three crosses bottony vert.


My cloak was a half-circle for the first two years, but I've wanted to enlarge it to a 3/4 cloak from almost the first time I wore it. I just lacked the incentive to clear the space to mark it out.  Being an apprentice has motivated me to finish my backlog of projects so this one became the next thing to do.

I added the two quarter triangles to the cloak and took it to dance practice, where I was able to spread it out on the floor and pin along the edge for trimming.  At this point it looked remarkably like a green Millennium Falcon:


I began the next phase at the A&S Solar in Nordenhal where I traced out the shape for the gold chief onto iron-on interfacing.  This was prior to adopting my new mantra, when I rather stubbornly used what I considered an ingenious modern method to turn the curves on the chief that would also prevent the edges from unraveling.  Yeah, I'm not doing that again.  The curves came out looking smooth and awesome, but it's not a process I can claim as Period.

The crosses, needles, and "thread" were all fraychecked, though.  I sewed the crosses onto the chief and couched them before sewing the chief onto the cloak.


The thread I couched down in all instances was DMC Pearl Cotton #3.  On the crosses and needles I used two strands, four strands on the chief, and one on the thread passing through the needles.  It was my intention to use Elegance fine twisted silk perle (#8) to hold down all the couching, but I ordered the wrong shade of green.  You might be able to notice the lighter stitches on the picture above.  I didn't like the effect of the light stitching on the Pearl Cotton, so switched to Pearl Cotton #5 for the crosses as I had it already and wouldn't have to delay the project while waiting for the correct color of silk to arrive. (Not to mention paying again for shipping.)


I finished the applique part of the cloak in time to wear it at Bjorn's Ceilidh.  I still need to line it, and even have the linen cut and pinned, ready for sewing, but didn't worry about pushing myself to completely finish it for the event.

Here is the unlined cloak:


The gold chief wraps around to the front.  I hope to make a separate hood out of the leftover green wool and line it with the gold linen, once I figure out what style of hood is appropriate for my time and place (1190's, England).

~ Marjorie

* Thank you Lady Ruth for teaching me this mantra.

Wednesday, October 28, 2015

Sewing Tip #1

Something I have known for quite a while is that my handspan is 8-inches.  This makes a great way to guesstimate the width or length of furniture while shopping without having to carry a measuring tape.  I had an epiphany yesterday while hand-sewing on my new dress.  Measure my thumbnail and see if it's close to the 1/2-inch I like to use as my seam allowance.

Oh Frabjous Day!  It is exactly 1/2-inch wide.


I no longer have to keep measuring my seam every few stitches.  I just aim the needle to the lower edge of my nail.

There is a trick to this method, though.  You need to make sure the upper edge is aligned with the material in a consistent manner.  Otherwise, your seam is less than perfect.


Perhaps there's actually two tips in this post.

~ Marjorie


Nalbinding Bag

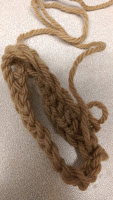
I've finished my first nalbinding project.  It's not much, but it's done and it works.

This bag is the second in my series of bags that will camouflage my anachronisms; asthma inhaler, cell phone, water bottle, very sharp scissors, etc.  I went a bit overboard on the length while talking to people at dance practice and not paying attention to how many rounds I made.


That doesn't stop it from working, though.

My next nalbinding project (hope, hope) will be a pair of mittens using the mammon stitch.  I still need to learn it and become more consistent with my tension, so don't look for them anytime soon.


Meanwhile, I'm appliqueing my device onto my cloak.


~ Marjorie


Friday, October 16, 2015

Nalbinding

I've done it.  I've joined the ranks of those who love nalbinding.  Thank you, Mistress Ose!  

She and I and Lady Lorita Di Siena met at my house on Monday the 5th, for a beginning nalbinding lesson.  I'm hooked.  She showed us how to begin the base chain, aka "caterpillar", then the Oslo stitch.  Here is my first attempt:


Sometime afterwards, close to a week later, I tried to start an actual project, a covering for my cell-phone during events.  I started just fine, made my caterpillar, then connected it to start my second row.  It took only a few stitches to realized I'd made the basic blunder of twisting my caterpillar.

Pits.

It took me two more tries to understand that what was intuitively to me the top of the caterpillar was actually the bottom.  Now I'm cooking.  I continued with the one I successfully connected and went around using what I thought was the Oslo stitch.  But it looked different, with a ridge instead of smooth.  Humph.  I put it down until I could research it some more, like by checking Ose's blog (www.osesilverhair.blogspot.com).  She had mentioned to Lorita and I that she had a handout from one of her classes there we could reference.

I didn't get around to doing that until yesterday, just before I showed my niece how to do this cool, medieval/viking craft.  So only a ten days after I first learned the basics, I was teaching them to my first student.

 Jenny making her caterpillar.  She's excited about having something to do while recovering from ankle surgery.

Here's the piece I made while teaching Jenny, with properly made Oslo stitches. 

We were back home last night in time for dance practice.  While there I worked on the cell phone case.  I completed one round of the ridged stitch and then the subsequent with Oslo.  I may add another round of ridges for decoration, as it looks kinda cool.  What do you think?


~ Marjorie

A knotty solution ... NOT!

Pondering bags again.  Specifically the sliding closures on the drawstrings of the German bag.

A Google search for "reliquary bags" brought me to this page, http://www.larsdatter.com/pouches-drawstring.htm which led me to the Belgian Art Tools and Links site, http://balat.kikirpa.be/search_all.php.  The recommended search for "bourse" resulted in pages of items, some of which were actually what I wanted.  The photos of bags in the rest of this post are from this site.

 I noticed a series of bags which had some sort of woven object on the drawstrings that looked like it would slide up to keep the bag tightly closed.

Object number: 43493 http://balat.kikirpa.be/photo.php?path=M194705&objnr=43493&nr=77

 
Object number: 43477 

Object number: 43186 


The word "knot" did not occur to me until I zoomed in on one and realized it's resemblance to the knot at the end of the paracord bracelet I'd made for my husband.


I reviewed the video I used to make this knot, https://www.youtube.com/watch?v=tQ9VL2IVlFM&index=13&list=FLeqTsg8HLrOl-9iTM3zSZ3Q and it quickly became apparent that this was not the correct knot, it could never be made to slide.

I continued the hunt for the right knot back on Google, this time searching for "medieval knot", and found gold in the form of a blog post titled "Tassels&Co: Turk's head knot basics" from Medieval Silkwork: http://www.medievalsilkwork.com/2015/07/tassels-turks-head-knot-basics.html.

Now armed with a name for the knot I searched and found lots of info about it, including many descriptions and videos on making one.  The most helpful to me was this series of pages: http://www.hought.com/art.6bth.1.html.  You need to make sure you click on parts 2 and 3 to get the full instructions.

Even so, it took me many tries to find the right thing to start wrapping it around (my finger), properly decipher right-handed directions for my left-handed brain, and then shrinking it down to a more reasonable size.  Here is my first Turk's head knot:


I'll make a second and put them on the drawstrings of the brown bag, just to see how they work.

This was all a delightful side trip in the world of medieval bags, but it does nothing to help me with the conundrum of how the disks on the German bag were made. 


It's looking very much like material is wrapped around a disk of some type (metal), based on the above button.  The material seems to have worn off part one edge of the disk.  The material also seems to have the same texture at the embroidered skirt on the lady.  Could the material be covered with embroidery?  I must write the museum!

~ Marjorie 


Saturday, October 10, 2015

Bags

I have been contemplating bags, fabric sacks for carrying whatever needs to be brought along.  There is, of course, the 1170 German bag I will be reproducing when I understand the techniques involved.  Then there's something Ose told me, that when Baron Master George Emerson True was learning different stitches, he would practice them by making bags to hide his wallet, phone, and other modern devices he wanted to disguise.  Sewing bags also allowed him to work on something small and unobtrusive during court.

I was at the coronation of Brennan II and Caoilfhion II this past Saturday.  As we all know, Coronation is ALL court.  I gathered material, thread needles, scissors, etc. and started a bag during morning court.  The German bag is approximately 3" x 5" and this first bag is quadruple the size at 6" x 10", big enough to hold my fast-acting inhaler and tube.  I used brown linen, modern thread for the seams and bottom hem and Pearl Cotton for the trim and decorative stitches.

Construction proceeded thus:

- Pulled threads to straighten edges of material, keeping the selvage on one long side.
- Folded along short edge to create a piece half the original width and the same length as before.
- Sewed the seam with a running stitch using the modern thread, right sides together.
- Finger-pressed seam allowance (1/2") open.
- Turned right side out on itself so that one opening has a folded edge and the other has four raw edges.  The folded edge is the top, the other the bottom.  The bottom edges I folded in to encase the raw edges.
- While both ends were still open, sewed on a length of monks cord made with #5 Pearl Cotton


- Overcast the folded bottom edges with #8 Pearl Cotton (see above).  (I'm left-handed, hence the backwards look to my stitches for most of you.)
- Used a stab stitch because of the number of layers (8) to make a strong bottom seam to the bag, going one direction then doubling back to fill in the stitches on the other side. (see below)  This seems to be how the German bag is made.


- Lastly, overcast the folded edge at the top with #8 Pearl Cotton.

The monk's cording for the drawstrings is made and waiting for me to test my theory on how the German bag was closed...

~ Marjorie

Tuesday, October 6, 2015

Lady Ruth's 15th Century Outfit

Work has begun on the dress for Ruth and already I have learned one very useful thing.  While looking at paintings, settling on a design, Ruth made a very profound statement, "We need to start with the chemise and then work out to make sure the necklines match up properly."

Obvious, I know, but not something I'd thought of before.  You have to remember my background.  While I've been sewing clothes since fifth grade, I've only made one item at a time: a shirt, a skirt, a jacket.  None of them required thinking about the undergarments, unless the placement of darts was needed.  The concerns I must consider when creating a multi-layered outfit are new, but I'm glad this one was pointed out before material was cut.

Ruth and I have met two successive Fridays so far.  During the first we decided on the look she wanted, taking into account time period and personal preferences for how the dress fits and is fastened. Second we took down her measurements.  Then we ate and played Carcassonne.  During the week, Ruth realized we could use the pattern she has for a chemise she has already made, with alterations to the neckline.  The next time we met I redrew the yoke and sleeve patterns.  By the time we had cut out the yoke, sleeves and gussets we were ready for a break.  Time to eat and play Carcassonne.

In between those two meetings, we and three other friends took a field trip to West Springfield to scope out Osgood's, a textile warehouse.  Oh, the fabrics they had.  It's not a place for the faint of heart or lean of wallet.  Linen is not cheap, but they had many colors and prints.  Wool.  Some of the wool is to die for, soft and fluffy.  Wool in the full spectrum of colors,  and many, many plaids.  Yardage and fixtures for drapes, Upholstery fabrics, cottons, spandex for swimsuits.  I bought a soft, green wool I'll use for a period dress for cool weather or sites.  It's thick and warm and feels like polar fleece.  Ruth bought material for her outfit, a nice medium blue wool for the outer dress, a burgundy (?) for the kirtle, and something else for the fold-over cuffs on the sleeves.  It'll be smashing together.

~ Marjorie

Monday, September 21, 2015

Projects

I have a belt.  I am very proud of this belt.  I'll never use it to hold up my jeans, it's way too long.  It will, however do an admirable job of indicating my new, lowly status.  The belt is green, and was given to me by Mistress Ose Silverhair.

I am now her apprentice.  {Squeeee!!!!!} 


(Okay, I promise to be more dignified for the rest of the post.)

Mistress Ose is a fiber-arts/spinning Laurel, whereas I will be focusing on medieval pattern making, clothing design, and sewing techniques.  It will be an interesting journey as I set aside "modern" habits and thinking to learn how to parse paintings and duplicate drawings to recreate clothes of different places and times.  I already have two new projects to work on along with two older projects to finish.

My first major, long-term research project will be to recreate this 1170 German purse/bag:


It's silk thread on red linen, with some sort of buttons along the edges, a drawstring, and a separate cord for it to hang from a belt.  It's a whopping 10 x 13 cm, basically 3 x 5 inches, big enough to hold modern ID cards and some money, not big enough for my HTC One 8 cell phone though.  That's okay.  I'm working on minimizing how much weight hangs from my lovely green belt.

There will be a lot of research and learning of techniques involved with this project.  I'll be writing the museum (Alfred Bonno Museum in Chelles, France 
http://www.chelles.fr/Culture/Musee-Alfred-Bonno) to see if they can tell me more about the buttons, lining, embroidery stitches, cording, and more importantly, send me high-res photos to inspect details myself.  The embroidery looks like split-stitch at first glance.  I have to master that.  The cords are probably some form of handloop cords I don't know.  And those buttons... I have no idea what'll be involved in recreating them, but I'm quite certain it's not a skill I currently possess.

My second major project, which has a more immediate due date, is to create patterns for a 1470's Flanders outfit for Lady Ruth Baraskya.  I'll have more details as we progress on this project, but it will involve drafting patterns for a chemise, a lined kirtle, and an overdress.  Ruth will do the sewing once I come up with the patterns and an order of assembly for her.

The two hands-on sewing projects I'm finishing are my first completely hand-sewn dress and my cloak.  The dress is a basic 12th century rectangular dress with triangular gores in the skirt and gussets at the underarms.  I'm still unsure of the final sleeve design, large, swooping open sleeves versus tighter, arm-fitted sleeves.  In either case I'll be doing beaded embroidery around the neckline.  I'll show research and other pictures in a future post.  The cloak project is just adding more material to my half-circle cloak to make it a 3/4 circle to fit me better.  I'll also be lining it and appliqueing my device onto the back.  (For those who speak heraldese: Vert, in saltire two needles threaded, argent, and on a chief invected Or, three crosses bottony vert.)

I apologize for the overload of information on this first blog.  I'll write more often and in smaller bits in the future.

Thanks for listening,

~ Marjorie